Building Knitting Companion in Django - Development Diary
“All extremes of feeling are allied with madness.”
― Virginia Woolf, Orlando
I must admit that over the past couple of months, I have become obsessed with knitting. I’ve been reading about everything from yarn compositions to exploring the latest tools and wanting to recreate a million patterns that I see on Ravelry!
However, one thing that I still haven’t found is the perfect knitting dashboard/tool – so why not create one. I may be out of my depths here with this one, but I essentially envision a knitting assistant that will help me self draft a sweater.
Date : Monday April 14th 2025
Here’s the vision for what I’d love to be able to do in the first version of this tool. It all starts with selecting a sweater type — and for now, I’m keeping it simple and focused with just one: a set-in sleeve boat neck sweater. From there, I want the dashboard to help with shoulder calculations. The idea is to input basic gauge information and shoulder width (in inches or centimeters), and then have the tool calculate the starting stitch count, how many stitches to increase, and even where to place stitch markers. Ideally, it would also tell me how many rows I need and on which rows I should increase. Then comes sleeve shaping — the dashboard should handle increases based on the desired sleeve length and clearly show when and where to make those increases.s based on desired length
🌟 Dashboard Feature Wishlist
Here are some features I’m envisioning for the tool:
- 📂 Multiple Projects: Create and manage several projects at once
- ↺ Linked Row Counters: One for the body, one for each sleeve, all in sync
- 💬 Chat with Your Pattern: AI-assisted questions like “Wait, what does ‘ssk’ mean again?”
- 📄 Pattern Uploader: Upload your PDFs and manage all pattern files
- 🧠 Groq Integration: Auto-generate instructions, explain pattern abbreviations, suggest stitch counts
Tech Stack
- Django for the backend magic
- HTML/CSS to create the retro vibe
Date : Monday April 14th 2025 (Two Hour Check In)
Okay, confession time: I didn’t mean for it to get this retro. But once I stumbled on this beautiful red-and-beige checkerboard background (you know, that perfect balance between a ’70s kitchen floor and a warm quilt square), there was no going back.
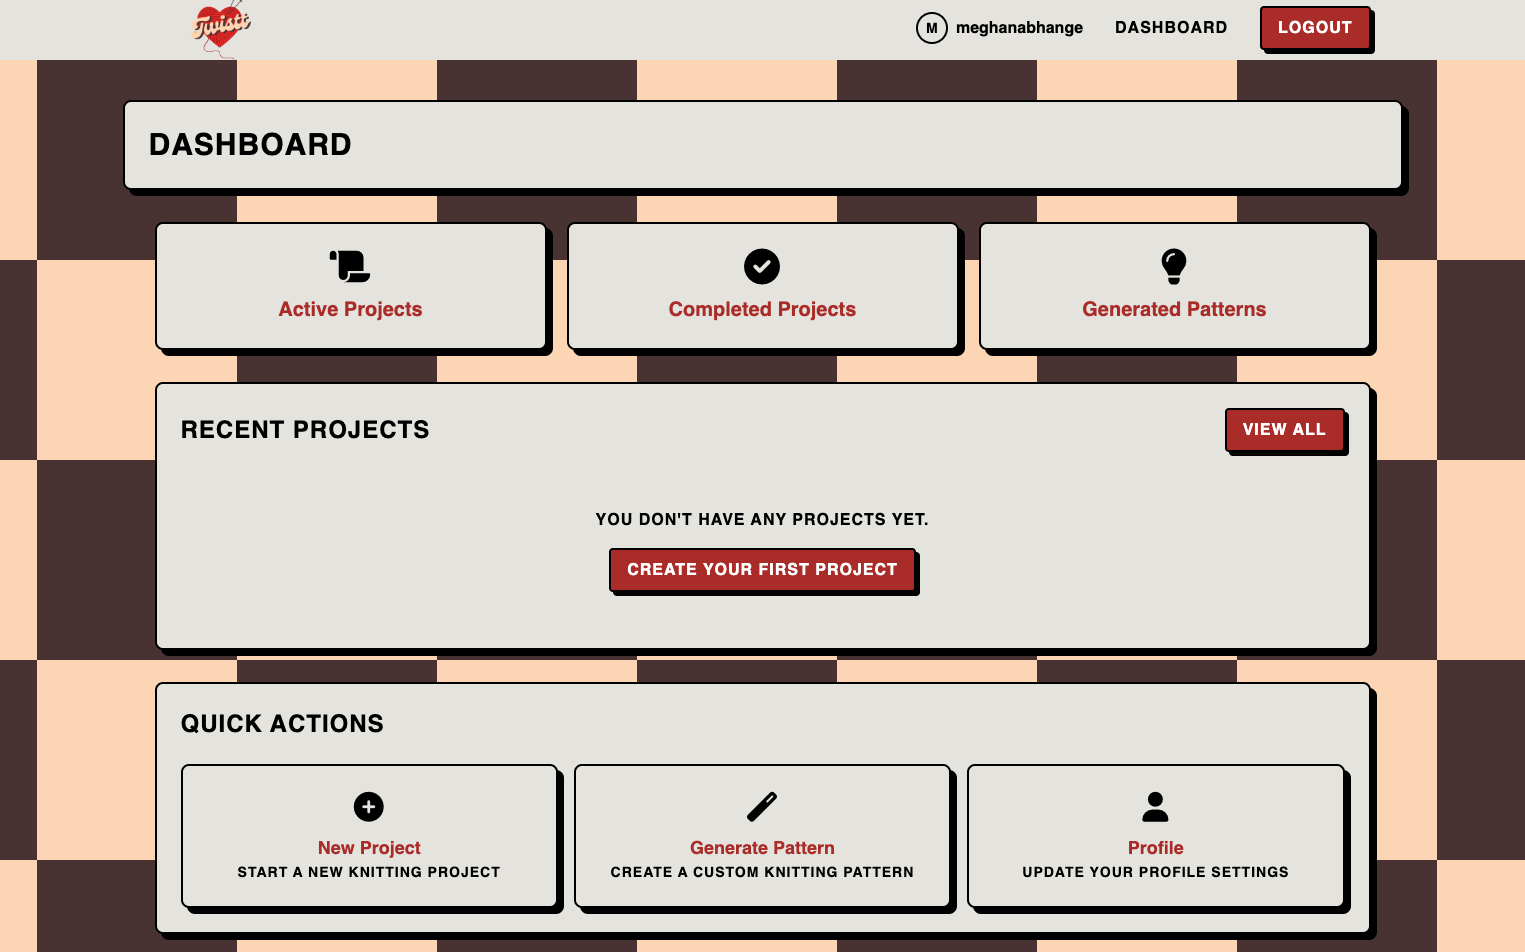
At the moment, the dashboard is purely a static HTML and CSS layout. While it visually represents the intended design and structure, none of the elements are connected to any backend functionality. This means:
- The “Recent Projects” section is static and does not list any real projects or handle actions like viewing or creating projects.
- The quick action buttons are visually present but do not trigger any backend processes or navigate to other views.
In essence, the dashboard serves as a visual prototype, showcasing the intended user interface without any interactive or dynamic capabilities. The next steps involve wiring up these components to Django views and models to bring the dashboard to life with real data and functionality.
Date : Monday April 14th 2025 (Five Hour Check In)
The next step to tackle was actually being able to generate Patterns. Now this isn’t that hard in python. So, did this using PatternType class that serves as the foundation for all our pattern types:
class PatternType:
    """Base class for all pattern types"""
    def __init__(self, name, description, schematic_path, fields):
        self.name = name
        self.description = description
        self.schematic_path = schematic_path
        self.fields = fields

    def get_schematic_url(self):
        return static(self.schematic_path)

    def get_fields(self):
        return self.fields

    def get_description(self):
        return self.description

    def generate_instructions(self, measurements, stitch_gauge, row_gauge):
        """Base method to be overridden by subclasses"""
        return []
This base class defines the common interface that all pattern types must implement. Each pattern type (like sweaters, tank tops, etc.) extends this base class and provides its own implementation of the generate_instructions method.
Writing the First Pattern
This pattern has detailed instructions for creating a boat neck sweater with set-in sleeves. Now given that I am not a knitwear designer, the instruction in this pattern are wonky and honestly vibes based. I have no idea if this would actually even work
class SetInSleeveSweater(PatternType):
    def __init__(self):
        super().__init__(
            name="The Twistt Boat Neck Sweater",
            description="A classic sweater with a fitted armhole and sleeve that joins at the shoulder seam.",
            schematic_path="pattern_generator/schematics/set_in_sleeve.png",
            fields=[
                {'name': 'chest', 'label': 'Chest Measurement (inches)', 'type': 'number'},
                {'name': 'length', 'label': 'Length (inches)', 'type': 'number'},
                {'name': 'sleeve_length', 'label': 'Sleeve Length (inches)', 'type': 'number'},
                {'name': 'shoulder_width', 'label': 'Shoulder Width (inches)', 'type': 'number'},
                {'name': 'armhole_depth', 'label': 'Armhole Depth (inches)', 'type': 'number'},
                {'name': 'collar_circumference', 'label': 'Collar Circumference (inches)', 'type': 'number'},
                {'name': 'collar_length', 'label': 'Collar Length (inches)', 'type': 'number'},
            ]
        )
The generate_instructions method for this pattern type takes the user’s measurements and gauge information and produces instructions for knitting the sweater. It includes sections for the collar, shoulder increases, sleeve shaping, and more.
Pattern Registry and Selection
To make it easy to add new pattern types in the future, a pattern registry was created:
# Pattern Registry
PATTERN_TYPES = {
    'The Twistt Boat Neck Sweater': SetInSleeveSweater(),
}
This registry makes it simple to add new pattern types over time.
Saving Patterns
This was implemented this with a SavedPattern model:
class SavedPattern(models.Model):
    STATUS_CHOICES = [
        ('active', 'Active'),
        ('ready', 'Ready'),
        ('pending', 'Pending'),
    ]

    user = models.ForeignKey('auth.User', on_delete=models.CASCADE, related_name='saved_patterns')
    name = models.CharField(max_length=255)
    pattern_type = models.CharField(max_length=100)
    measurements = models.JSONField()
    stitch_gauge = models.FloatField()
    row_gauge = models.FloatField()
    instructions = models.JSONField()
    status = models.CharField(max_length=20, choices=STATUS_CHOICES, default='pending')
    created_at = models.DateTimeField(auto_now_add=True)
    updated_at = models.DateTimeField(auto_now=True)
This model stores all the information about a generated pattern, including the user’s measurements, gauge, and the generated instructions.
Pattern/Project Status System
For the saved patterns the UI also allows for:
- Active: Patterns/Projects that are currently being worked on
- Ready: Patterns/Projects that are complete and ready to be knitted
- Pending: Patterns/Projects that are saved but not yet started
Date : Thrusday April 17th 2025
Change 1: Making the UI Shine 🌟
I finally got around to adding proper mobile support across the app—things actually look decent on a phone now! Also Added a bunch of interactive elements like subtle animations and gifs.
Also, did a massive div cleanup. There were… so many. Nesting inside nesting inside nesting.
Change 2: Tracking Completed Steps in a Pattern 📝
One thing that bugged me was the lack of visibility into how much of a pattern I had actually completed. So I added a new model to the mix: CompletedInstruction. This model keeps track of the pattern, which step is completed (identified by something like step-3), whether it’s done, and when it was done.
class CompletedInstruction(models.Model):
    user = models.ForeignKey(User, on_delete=models.CASCADE)
    pattern = models.ForeignKey("SavedPattern", on_delete=models.CASCADE)
    instruction_step = models.CharField(max_length=255)
    completed = models.BooleanField(default=False)
    completed_at = models.DateTimeField(auto_now=True)

    class Meta:
        unique_together = ("user", "pattern", "instruction_step")

    def __str__(self):
        return f"{self.user.username} - {self.pattern.name} - Step {self.instruction_step}"
With that in place, I updated the dashboard view to fetch the saved patterns, then loop through them to determine which steps are done.
The POST endpoint update_instruction_status – when a checkbox gets clicked in the UI, sends over the step ID and whether it’s completed. The backend then uses update_or_create to either make a new record or update the existing one.
@require_POST
def update_instruction_status(request, pattern_id):
    if not request.user.is_authenticated:
        return JsonResponse({"error": "User not authenticated"}, status=401)

    step_id = request.POST.get("step_id")
    completed = request.POST.get("completed") == "true"

    try:
        completed_instruction, created = CompletedInstruction.objects.update_or_create(
            user=request.user,
            pattern_id=pattern_id,
            instruction_step=step_id,
            defaults={"completed": completed},
        )
        return JsonResponse({"status": "success"})
    except Exception as e:
        return JsonResponse({"error": str(e)}, status=400)
This means the checkbox state is persistent and reflects across sessions.
Section 3: Pre-commit Hooks and Deployment 🚀
Code hygiene is always so hard to keep up – finally got around to it.Added pre-commit hooks.
For deployment, I moved everything to DigitalOcean’s App Platform with PostgreSQL as the database.
Some portions of this content were edited or refined using AI-assisted tools, including ChatGPT-4, Grammarly and Quillbot. These tools helped enhance flow, grammar, clarity, structure, and code readability.
This project was also developed using Cursor, an AI-powered coding environment that enabled faster iteration.
All content has been carefully reviewed and manually validated to ensure technical accuracy, alignment with cited sources, and consistency with the intended context.